Protocol for Bacterial Biofilm Visualization and Sample Preparation for Scanning Electron Microscopy
Protocol for Bacterial Biofilm Visualization and Sample Preparation for Scanning Electron Microscopy
This User Protocol describes a workflow to grow a bacterial biofilm in the µ-Slide I Luer 0.8 (ibidi, 80196) under static conditions and subsequent visualization using both confocal laser scanning microscopy (CSLM) and scanning electron microscopy (SEM). Pseudomonas aeruginosa DSM 50071T was seeded in the µ-Slide I Luer 0.8 and then allowed to grow for three days. To favor cell attachment and biofilm formation on the surface, the growth medium was refreshed after approximately 36 hours of incubation, removing the planktonic cells. To confirm biofilm formation, the growth medium was supplemented with an optotracer, EbbaBiolight 680. This molecule is non-toxic and therefore compatible with live imaging. It emits red fluorescence when bound to proteins and polysaccharides of extracellular matrices, and as such constitutes a visual marker for bacterial biofilms. Based on DNA dye staining with DAPI and imaging using CLSM, the bacterial cells attached and mostly formed a mono- or bilayer. Thicker biofilm structures could be identified by an increase in fluorescence signal emitted by the optotracer. The aim was to combine multiple imaging techniques on the same slide. Hence, after CLSM imaging, cells were fixed on the same slide, dehydrated, and then dried for SEM imaging. A 3D mold was created in-house to carefully isolate the coverslip, avoiding disturbance of the spatial organization of the attached cells. The formed bacterial cell layer was then imaged at magnifications ranging from 2,000x to 15,000x on the isolated coverslip.
Related Documents
• Instructions µ-Slide I Luer (PDF)
• Protocol III: Biofilm tracking in live cultures using EbbaBiolight 680
1 Materials and Reagents
1.1 Cells and Reagents
• Pseudomonas aeruginosa culture (DSMZ, 50071)
• Tryptone (Thermo Fisher Scientific, 211705)
• Peptone from soymeal (Millipore, 1.07212)
• Glucose (VWR, 24379)
• Sodium chloride (NaCl, VWR, 27800)
• Dipotassium phosphate (K2HPO4, Sigma, P3786)
• Phosphate buffer saline (PBS, Sigma, P7994)
• EbbaBiolight 680 (EbbaBiotech AB)
• 4',6-Diamidino-2-Phenylindole (DAPI, stock conc. 1 mg/mL, Thermo Fisher Scientific, 62248)
• Glutaraldehyde 25% (Sigma, G7776)
User Protocol 14
• Deionized water (diH2O)
• Absolute ethanol (Sigma, 34852-M)
1.2 Buffers and Solutions
Culture Medium
• Tryptic soy broth (TSB; 17 g/L tryptone, 3 g/L peptone from soymeal, 2.5 g/L glucose, 5 g/L NaCl and 2.5 g/L K2HPO4)
• TSB supplemented with 1:1000 EbbaBiolight 680 Washing Buffer • 1x PBS
Staining Solution
• 1:1000 DAPI in 1x PBS (final conc. 1 µg/mL)
30%, 50%, 70%, 90%, 100% (v/v) Absolute Ethanol Dilutions
• Mix appropriate volumes of diH2O and absolute ethanol
1.3 Equipment
• µ-Slide I Luer 0.8, ibiTreat (ibidi, 80196)
• Laminar flow cabinet
• Fume hood
• Incubator, 30°C
• Incubator, 55°C
• Pipettes
• Fridge
• Desiccator
• Scalpel or blade
• Scissors
• Tweezers
• Cutting mold (see example in Figure 1)
• Inverted confocal microscope (here: ZEISS LSM 880)
• ZEN black 2.3 SP1
• (Fiji Is Just) ImageJ 1.54f
• Scanning electron microscope (here: JEOL JSM-6480LV)
• Gold coater (here: JEOL JFC-1200 fine coater)
• Carbon tape
• JEOL JSM-6480 version 7.07
| Figure 1: Diagram of the cutting mold used to cut out the coverslip from the µ-Slide I Luer 0.8. The white lines represent the cut position, along the µ-Slide (bottom) and just outside the reservoirs (top). |  |
2 Procedure
2.1 Bacterial Biofilm Attachment
Please read the Instructions before working with the µ-Slide I Luer 0.8 and follow the recommendations for general pipetting and changing solutions in the µ-Slide. Perform all steps under sterile conditions. Before starting the experiment, prepare Pseudomonas aeruginosa DSM 50071 as overnight culture by inoculating the strain in LB medium in an Erlenmeyer flask (e.g., 100 mL) at 30°C and 160 rpm in the dark. Dilute the culture 1:100 in the medium containing the optotracer 1:1000, as per supplier instructions. Note that the cell concentration was not adjusted to the supplier’s recommended values.
Important Note: Equilibrate the required materials, such as µ-Slides, overnight inside the incubator at 30°C. Equilibration is essential for keeping air bubbles from emerging over time.
1. Inject 200 µL of diluted cells into the channel of the µ-Slide I Luer 0.8 and close with the supplied caps according to the Instructions.
2. Allow the cells to deposit and attach for 2 h at room temperature (RT) in the dark.
3. Add 60 µL TSB medium supplemented with the optotracer to each reservoir and cover both with caps.
4. Incubate the µ-Slide at 30°C in the dark and under static conditions for 1 to 2 days.
5. Exchange the medium by taking 100 µL from one of the reservoirs and adding 100 µL of freshly prepared TSB supplemented with the optotracer, according to the Instructions.
6. Repeat the previous step 5x to 10x to assure complete medium substitution, avoiding air bubbles.
7. Fill the reservoirs of the µ-Slide with 60 µL cell-free supplemented TSB medium.
8. Incubate the µ-Slide at 30°C in the dark and under static conditions for 1 to 2 days for further attachment and biofilm development.
2.2 DAPI Staining and Observation Under the CLSM
The staining is performed directly in the µ-Slide I Luer 0.8. Perform all steps under the fume hood.
Important Note: Avoid removing the total volume from the channel at once. The cells should not dry.
1. To replace the medium with 1x PBS, first remove 100 µL of medium from one reservoir. Then, add 100 µL of the 1x PBS wash solution to the other reservoir.
2. Repeat this process between 5 to 10 times, until the medium has been completely replaced by 1x PBS.
3. Replace the 1x PBS with the DAPI staining solution, following the pipetting technique previously described. Ensure the channel is filled completely with the DAPI staining solution.
4. Incubate the µ-Slide for 10 min at RT in the dark under static conditions.
5. Wash the excess dye with diH2O twice, following the pipetting technique previously described.
6. Wash a final time with 1x PBS, following the pipetting technique previously described.
7. Image the attached cells using a CLSM (Figure 2).
8. Store the µ-Slide in the fridge at 4°C (for up to two days unless the sample is fixed) until further processing.
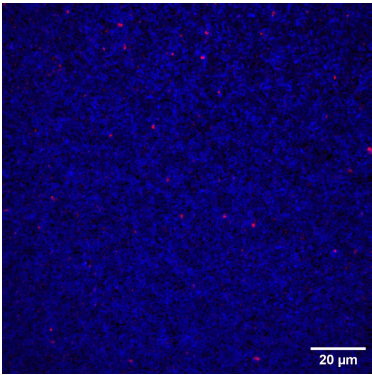 |
Figure 2: Confocal microscopy of a stained P. aeruginosa biofilm (red: EbbaBiolight 680 (Cy3.5), blue: DAPI). 63x objective lens. The cells are mostly attached in a monolayer. Some tri-dimensional structures resembling a biofilm are visible, particularly in the sections where the red signal is more intense, highlighting the optotracer binding to the biofilm components. |
2.3 Sample Preparation for SEM Observation
The sample preparation is performed directly in the µ-Slide I Luer 0.8. Perform all steps under the fume hood.
Important Note: Avoid removing the total volume from the channel at once. The cells should not dry. All washing steps and exchange of solutions were done according to the Instructions, by removing 100 µL of solution 1 from one of the reservoirs and adding 100 µL of solution 2 to the opposite reservoir. This process was repeated thoroughly to ensure the complete exchange of solutions.
1. Fix the attached cells by replacing the 1x PBS in the channel and reservoirs with glutaraldehyde 2.5% in 1x PBS, following the pipetting technique described in 2.2, first step.
2. Incubate the µ-Slide for 3 to 4 h at RT (or overnight at 4°C).
3. Wash the cells at least 5 times with 1x PBS to remove the glutaraldehyde solution entirely, following the pipetting technique described previously.
4. Sequentially dehydrate the attached biofilms by incubating in ascending 30%, 50%, 70%, and 90% absolute ethanol dilutions for 15 min each.
5. Dehydrate the cells in 100% ethanol twice for 20 min each.
6. Allow the channel to dry in the incubator at 55°C without the caps until the liquid is completely evaporated (here, for 2 h).
7. Store the µ-Slide in the desiccator until further processing.
8. Cut the coverslip out with a scalpel or blade, according to the diagram (Figure 3).
9. Keep the cut coverslip upright in the desiccator until further processing (for up to several weeks).
10. Cut the coverslip into smaller segments (≈1 cm long) and cover them twice with gold (Figure 4) before observing them under the electron microscope.
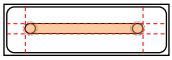
Figure 3: Diagram of the cut coverslip of the µ-Slide I Luer 0.8. The red dashed lines represent where the
cuts are done, following the mold and the colored section represents the coverslip that can be carefully
removed after cutting.
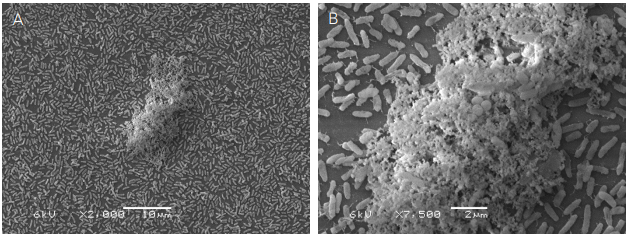
Figure 3: Scanning electron microscopy of P. aeruginosa cells and biofilm attached to the coverslip of the
µ-Slide I Luer 0.8 visualized with (A) 2,000x and (B) 7,500x magnification.
This User Protocol is an ibidi peer-reviewed protocol from an actual user. ibidi does not guarantee either its functionality or its reproducibility. For this User Protocol, ibidi provides only limited support. Please contact the corresponding author for detailed information. For research use only.